
|
|
|
 |
|
||||||||||||||||||||||||||||||||||||||||||||||||||||||||||||
|
|
||||||||||||||||||||||||||||||||||||||||||||||||||||||||||||
|
||||||||||||||||||||||||||||||||||||||||||||||||||||||||||||

|
|
|
|
I
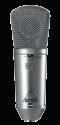
started with the Behringer B1 microphone which works very good. At
least for me at the time. There are better microphones out there if
your willing to pay the higher price tag. I've heard others using a
microphone costing $30.00 and it sounds like a $200.00 microphone. I'm
not getting that crazy into the audio stuff. The biggest problem I had
with the Behringer is that it's a very sensitive microphone. Listening with my headphone I was able to hear
cars coming down my street long before they reach my house. Airplanes
flying over the house, neighbors in the next block, well you get
the picture. This is a good microphone if you're in a sound control
room. A noise gate is highly recommended with this microphone it
will help
to limit some of the un-wanted background noise. I would not
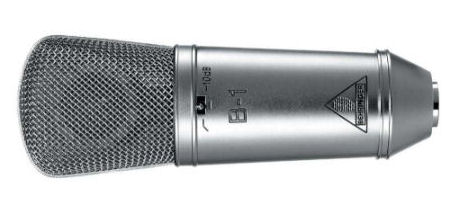
recommend using this microphone. I'm now using the Heil PR-781. The PR-781 it does not pickup all the background noise like the B1 and works well with my audio gear. James K6JRF shows a comparison between the Heil PR-781 and Electro Voice RE27 which is a $400 microphone. All the Behringer audio gear was purchased from ebay for $40.00 each back in 2008. The Behringer B1 microphone was purchased new for $99.99 with free shipping from Musician's friend. The Heil PR-718 was purchase from R&L Electronic at $139.95 |
|
|
|
|||||||||||||||||||||||||||||||||||||||||||||||||||||||||||||
|
|
|||||||||||||||||||||||||||||||||||||||||||||||||||||||||||||
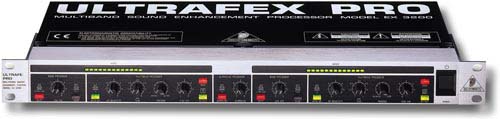
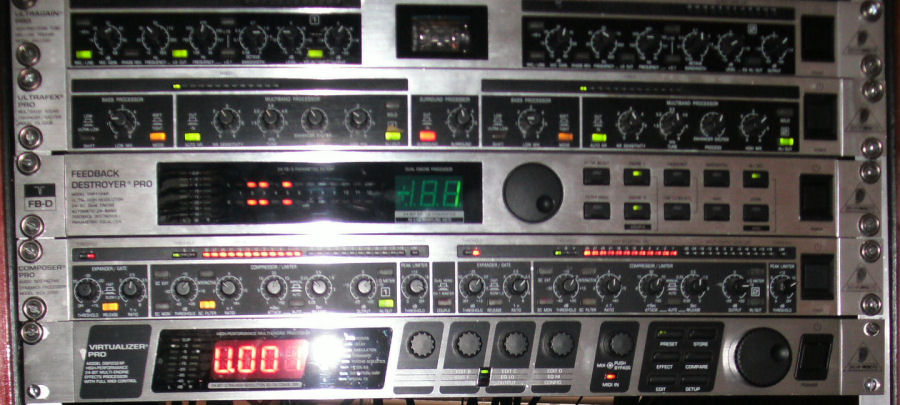
| EX3200 ULTRAFEX
PRO: Multiband processing for
simultaneous low- and high-frequency enhancement “Natural Sonic” processor for extremely musical sound enhancement VSP (Variable Sound Processing) circuitry for simultaneous enhancer and exciter processing "Dual Mode" ultra-bass enhancer for awesome soft and tight bass sounds Shift function allows you to control the frequency range of added bass punch Surround processor for spatial enhancement and improved stereo imaging Built-in noise reduction system. |
|||||||||||||||||||||||||||||||||||||||||||||||||||||||||||||
|
|
|||||||||||||||||||||||||||||||||||||||||||||||||||||||||||||
|
|||||||||||||||||||||||||||||||||||||||||||||||||||||||||||||
|
DSP1124P -
FEEDBACK DESTROYER PRO :
Dual channel
feedback suppressor
|
|||||||||||||||||||||||||||||||||||||||||||||||||||||||||||||
|
|||||||||||||||||||||||||||||||||||||||||||||||||||||||||||||
MDX2200 COMPOSER PRO:
This unit is used to remove background noise and
also service as a compressor limiter.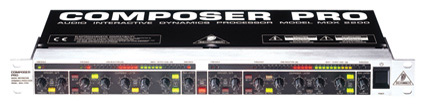 |
|||||||||||||||||||||||||||||||||||||||||||||||||||||||||||||
|
|
|||
|
Live On The Air Audio Recordings |
|||
|
|||
|
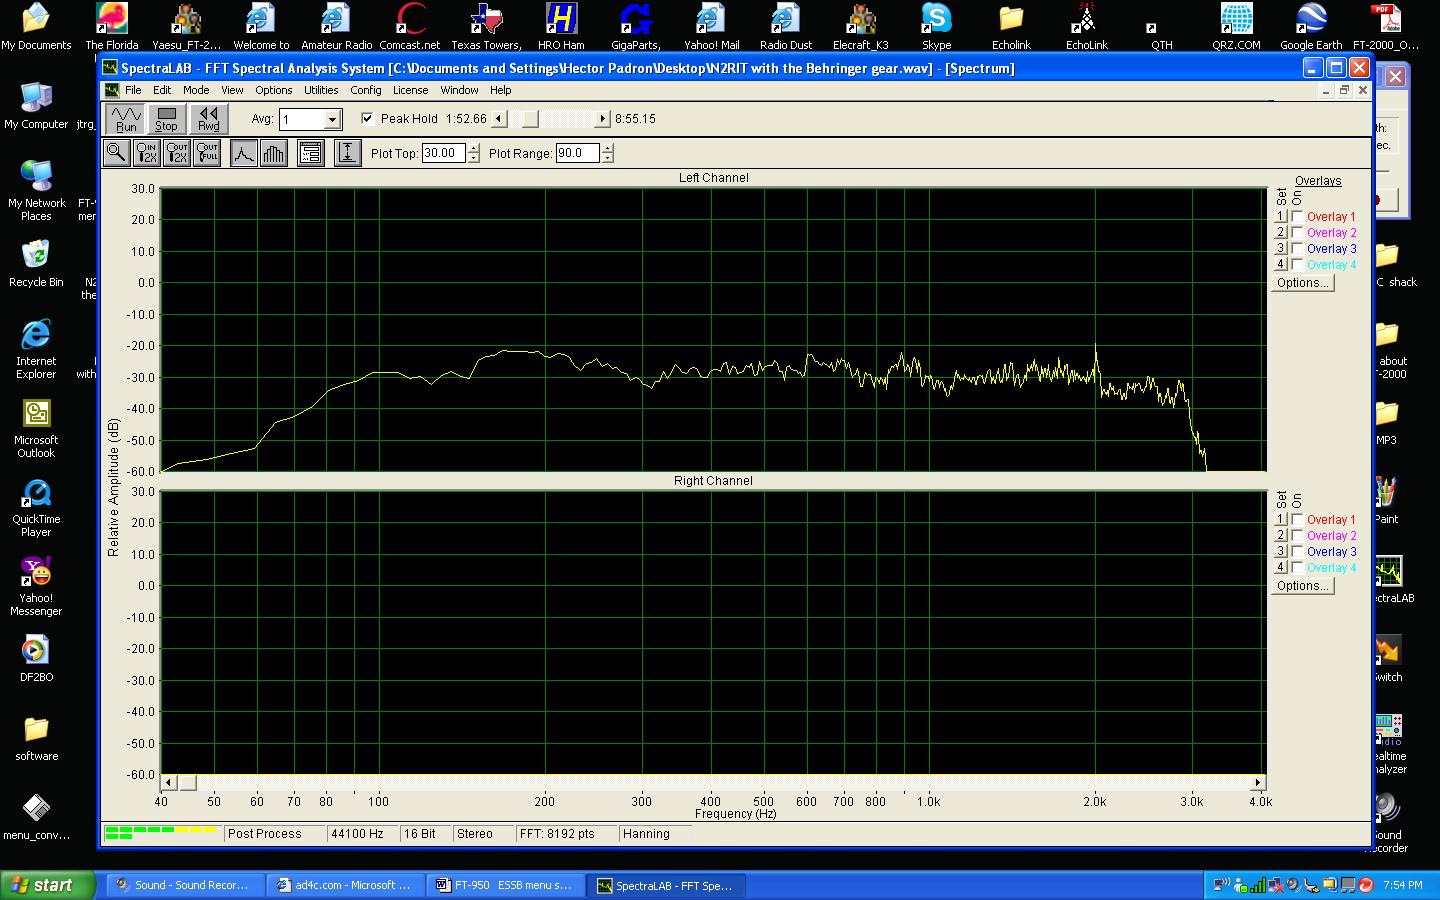
Graph taken by AD4C 6/6/2009
|

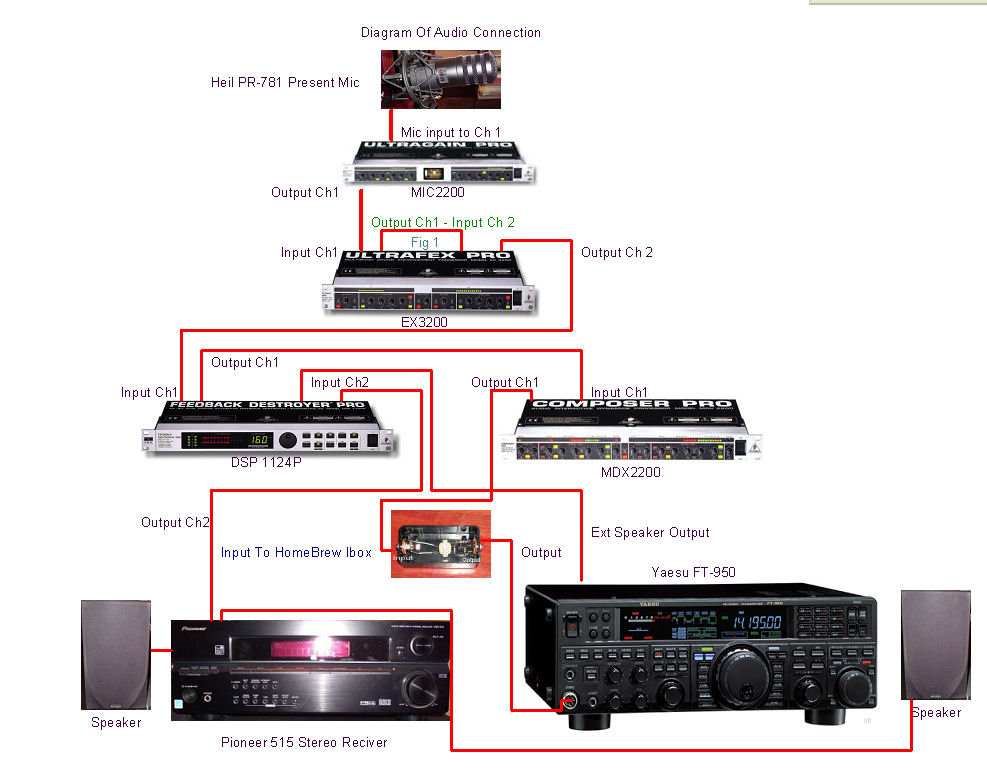
New Audio Setup
|
|
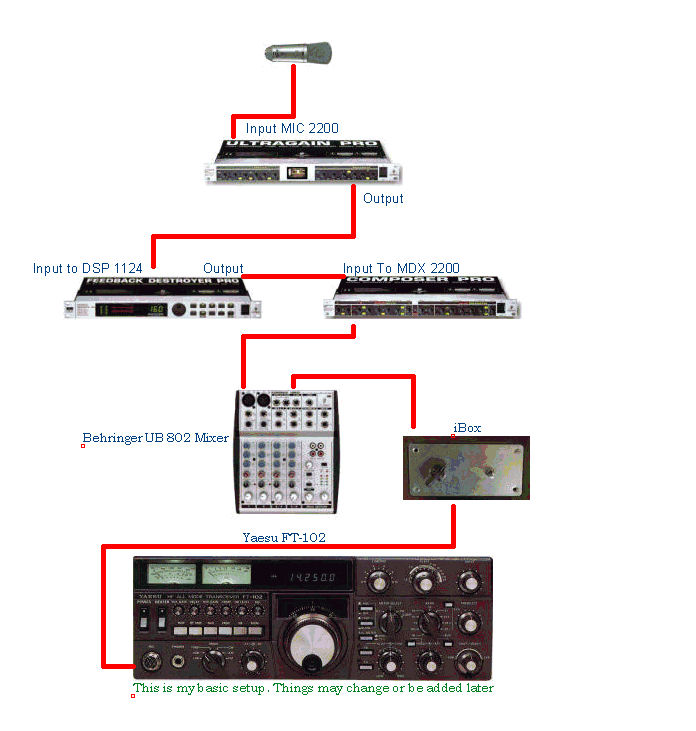
Old Audio Setup
|
|
|
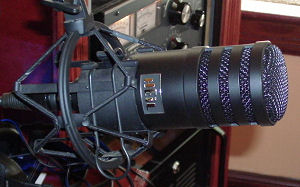
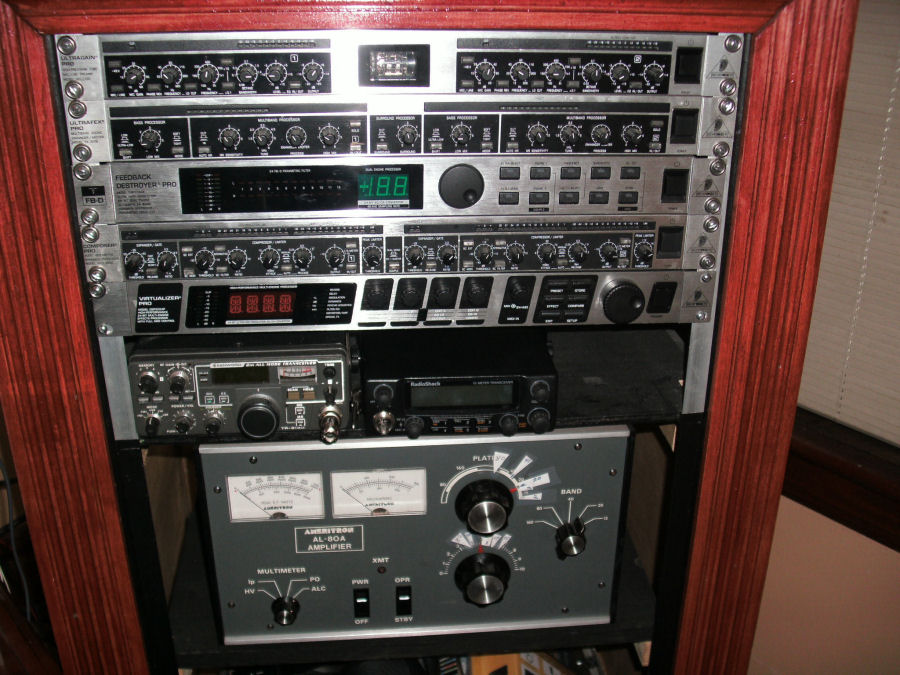
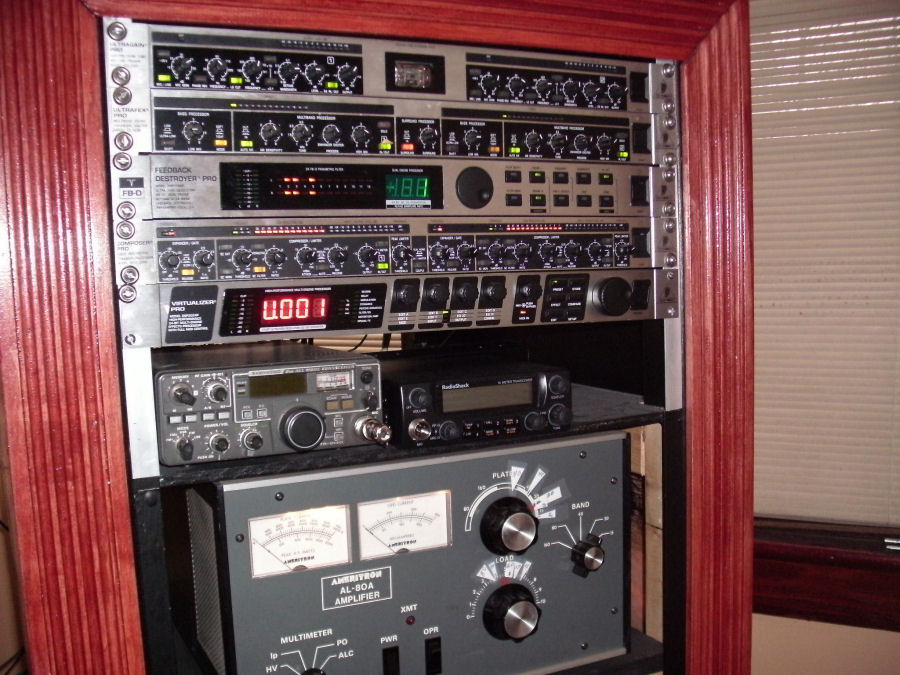
Here's a few pictures of my Behringer audio gear in a home brew rack. II Place cursor over image for a larger view |
|
|
|
|
|
|
|
|
|
|
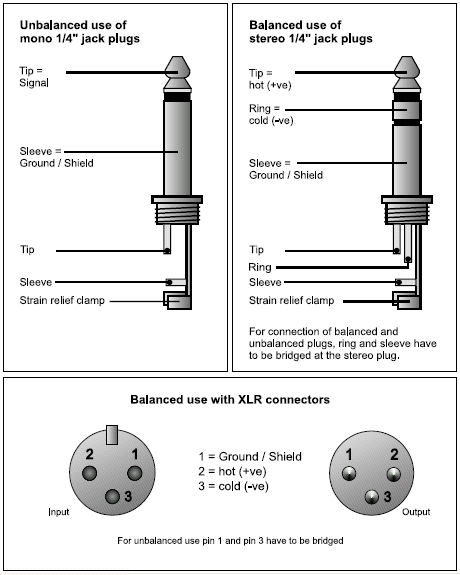
I would not
suggest running any rack gear directly into the front of your radio
without some type of audio pad or ibox. The audio coming out the rack
gear is usually much greater than the audio front end of your radio
can handle. This pad should bring the audio level down about 23db
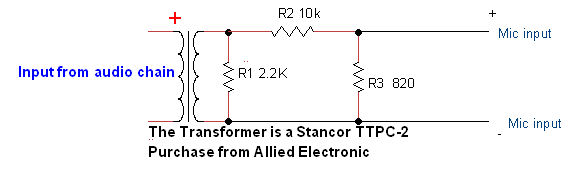
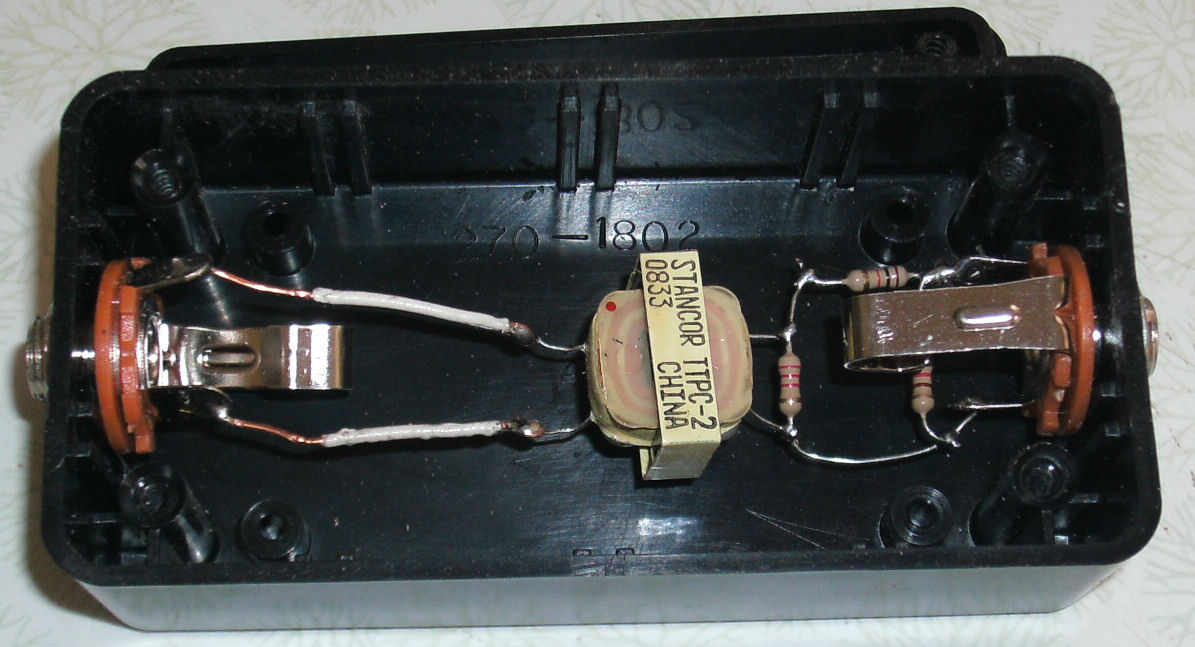
between the rack and radio. Below is one of two different types of pads that I've built. This is a very simple one that works. You may have these parts in your junk box. The main part is the isolation transformer which can be purchased from Allied Electronic for about $5.00. I purchased a couple of these to have on hand. All resistors are 1/4 watt. Connector can be whatever works for you. Because you do not need to have a balance input from the last piece of rack gear into the radio. I used 1/4 phone connectors. I key may radio via the PTT connector on the back of the radio with a foot switch or the desk switch. I usually run vox so I don't used either very much. I would subject using a metal box if you can get one. If using a metal box do not connect any resistors to ground. This is a floating ground. I have not had any problems using a plastic box. Note that the transformer has a (RED DOT) on it. My schematic is indicated by a red plus sign this is the input for the rack gear. Resistor R2 10K can be a variable one if you want adjust the level. But found that the fix value works just fine. This transformer is 600 ohms on the primary and secondary. Frequency range 300 - 3500 Hz |
|
|
|
|